Hiya to all the crafty people who are stopping by at the Kennedy Grace Creations blog today. I'm here with a bit of a treat. I have LOTS of tags to show you. The best part is that I'm showing different ways to use the same stamp sets. I hope this gets you thinking!
When I first started on my project the only thing I really had in my mind was that I wanted to make tags and I wanted to use some of the gorgeous Kennedy Grace Creations sequins. I mean, have you looked at all the different sequins they have available??
Let's dive right in to the first set.
Look at all the pretty sequins! Let's take it tag by tag so I can give you all the details.
I started by cutting out a piece of cream colored cardstock with a stitched die. This was not intended to be a tag but I punched out a hole and instant tag! I stamped the floral image from Grace's Little Note and heat embossed it in silver. I masked it and sponged on Antique Linen distress oxide ink. Making it darker right next to the flowers and lighter as I moved away. I splattered on a little bit of clean water and dabbed it up with a paper towel. I then used my Zig Clean Color real brush markers and a waterbrush to color the flowers. I used a similar blue ink to stamp the sentiment from Time to Blossom. As the finishing touch, I added some Seaside Breeze sequins along the edge of the flowers. Added some ribbon and called it done!
For this tag I used a dark brown cardstock and heat embossed the flowers in gold. These flowers are also from Grace's Little Note. To add the color to this tag, I used Prismacolor colored pencils. I love how sweet it looks on the dark brown cardstock! I added Chantilly Cream sequins and a cream colored ribbon. All done!
For the third tag in this trio, I once again used Grace's Little Note. This time I heat embossed the flowers in white pearl. It's a little hard to see in the picture but it's just lovely in real life! I went back to using Zig Clean Color real brush markers and waterbrush to color the images. You guessed it, I added some sequins! These are the Cotton Candy sequins. I love the fact that there are different sizes in this mix. I managed to leave room for a sentiment on this tag unlike the brown one. I carefully curved a sentiment from Beautiful Bloom Sweet Rose and stamped it in a matching pink ink. A little ribbon and another one is done.
Now, you're probably thinking three doesn't seem like a lot of tags. Well, you're right. I'm not done! I've got THREE more tags to share with you!! You'll find that my second set of tags is a lot different than the first trio but that's what so great about it! Let's reveal trio number two.
Everyone knows Christmas is coming. You can hardly miss it in the stores. Well, I thought it would be a good idea to make up some Christmas tags. And you are probably wondering how I made Christmas tags as KGC doesn't really have any Christmas stamps. That is the beauty of it. They may not be specifically for one season or another but with a few tweaks, you can make them fit whatever you need!
I cut this tag out of a lovely dark green cardstock and embossed the Believe sentiment in gold and the santa (from MFT Stamps) in pearl. The Believe comes from the You Inspire Me stamp set and has so many great sentiments in it. I added some gold ribbon and it was all done. It would be super easy to whip up a batch of these in a variety of colors!
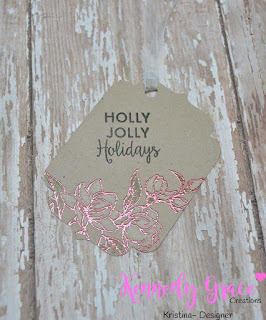
Tag #2 was cut from kraft colored cardstock. The flowers from Time to Blossom were heat embossed with a Crimson gloss embossing powder. The Holly Jolly (MFT Stamps) was stamped in plain black. I brought out my Prismacolor pencils again to add just a little bit of color. I think it makes it pop out a bit more. Again, I just added some ribbon and called it good!
We come to the third (and final) tag in this second trio. This time I used red cardstock and embossed the flowers from Beautiful Bloom Sweet Rose in silver. I used Prismacolor pencils again to add a bit of color. I only used white in the flowers and a tiny bit of green on the leaves. A little ribbon and ta-da!
Whew! That was a lot of fun!! I hope you will look at your stamps in a whole new way!
~See you later!
Kristina


Comments
Post a Comment