
Let's get in the "Mood"...

Let's get in the "mood" and by mood, I mean the latest Mood Board from Kennedy Grace Creations for this month!!  The colors are just gorgeous.  See for yourself!


So now that you've seen my inspiration, let's get to it!

I have recently learned to make never ending cards.  There are tons of great tutorials already out there and I found several on YouTube.  These things are awesome and now I just can't stop!  I figured this was the perfect time to make another one AND use lots of lovely products from KGC.  I'm going to take you through panel by panel.


I used a dark red as my main card base for the entire card.  The patterned cardstock all comes from the same 6" x 6" paper pad "A Perfect Autumn" from Echo Paper.  The gold glitter cardstock is made by Die Cuts With a View.

For this panel I used the Believe sentiment from You Inspire Me and the flowers are from Grace's Little Note.  I heat embossed them with a gold embossing powder.  I did sponge brown or dark red along the edges of  all the patterned paper throughout the whole card


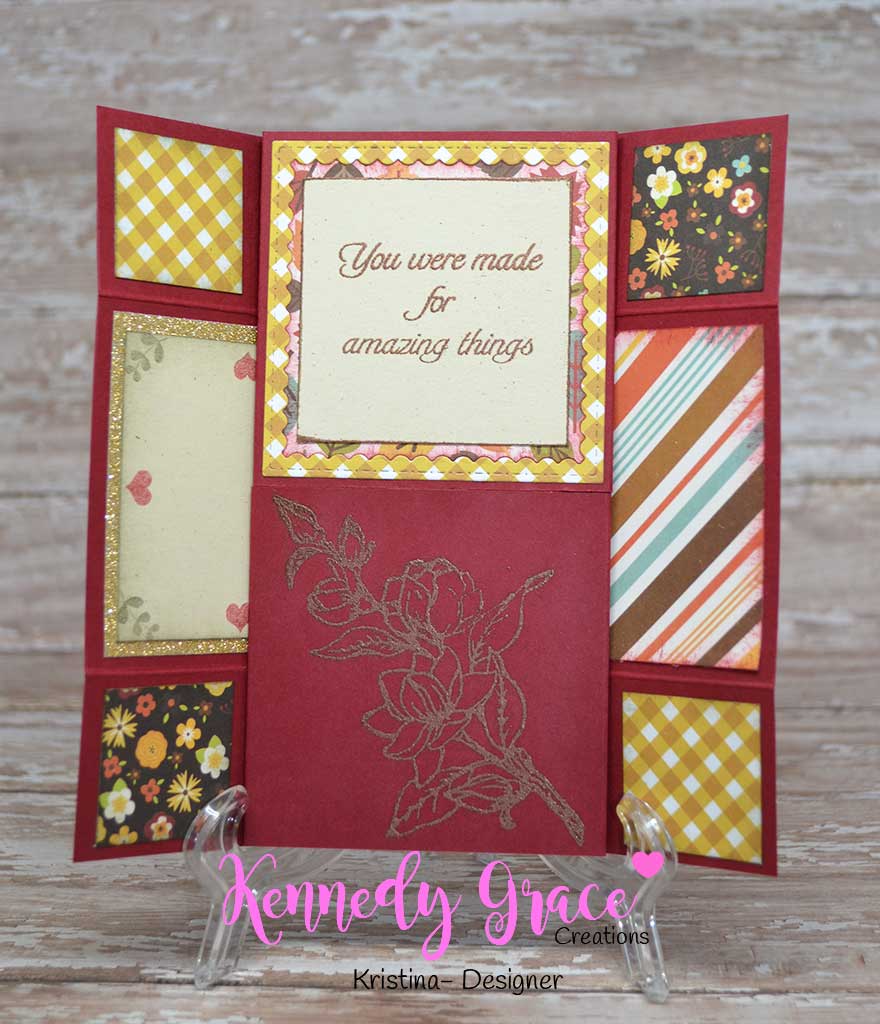
Panel two has a sentiment and the main floral image from Time to Blossom.  On this panel I used a copper embossing powder for the sentiment and flower.


For the third panel there are no large stamped images but several smaller ones.  One of the little squares I stamped a dark red on kraft paper with the small images from You Inspire Me.  For the large kraft square I again stamped some of the smaller images from You Inspire Me.  I used second generation stamping with a dark brown and a dark red.  I didn't want the images to be too bright.  I figured this panel could be used to hand write a small message or to put signatures.


For the fourth (and final) panel of the card, I used a sentiment from Friendship Blessings and a flower stamp from Grace's Little Note.  Both images were embossed with gold embossing powder.

I sure hope you like my never ending card.  They aren't very hard at all!  Now trying to take a picture of a never ending card without using your hand to hold it up...that's hard!

Don't forget that we would really love to see your creations on social media!  Tag us #kennedygracecreations!  Check out all our social media links below.

Until next time!
~Kristina

Please be sure to follow the Kennedy Grace Creations blog, facebook, twitter, instagram and pinterest. Our Design Team has great projects to inspire you with our great stamp sets. 

Comments

  1. It's beautiful!!! I love the combinations of stamps and pattern paper you used! Thanks for sharing.

    ReplyDelete

Post a Comment

Popular posts from this blog

Grand Opening Blog Hop

Hello Crafty Friends! Wow it has been a long time in coming but today is our official GRAND OPENING!  We are so exited for today!! We have been planning this for a very long time and can't wait to show you.  We have lined up some of the MOST AMAZING talented ladies in the crafting world on our hop today!  We hope you will enjoy all the amazing projects they will be sharing! Our Newest release is now available in the Kennedy Grace Creations Online Store.  https://squareup.com/store/kennedy-grace-creations What I created for the hop is this beautiful card. Metallics on cards is beautiful and I like the combination of it with flowers. I am using the brand new Beautiful Blooms Sweet Rose stamps set. It is a large rose stamp set with various sentiments.  It is so detailed and very pretty.  To celebrate our GRAND OPENING - Kennedy Grace Creations will be giving away 3 random winners $25.00 gift certificates to our Online Store. All you have to d

One Layered Card - Featuring Kennedy Grace Creations: Time To Blossom

Hey folks! I'm back to share a card from the Kennedy Grace Creations New Release! The stamp set I used today is the Time To Blossom Stamp Set . I really enjoyed the simplicity of this set. You could totally heat emboss this and do some fabulous watercoloring, but Copic's seems to be the way to go for me lately so that's what I did. I started by stamping the image twice on my card panel. The only masking I did was a tiny bit on the stem. The name of the game was to keep this super simple folks. As I said, I colored the images with Copic's. Another thing I enjoy about the Time To Blossom Stamp Set is that you could choose any colors you wanted. I chose red-violets and yellow-greens, but seriously peeps, whatever floats your boat and it will looks great! To finish off my card, I used a added a couple of hand drawn lines to the background and I stamped a portion of a stamp that is also in the Time To Blossom Stamp Set . That's it! Easy peasy. T
Welcome to the CDD Stamp & Die Release Blog Hop.    All stamps & Dies are in the  CDD Shop  and no w available for purchase. You may purchase stamps and dies here   Autumn Wishes Bundle The Autumn Wishes Bundle is available for this weekend only thru Sunday.  This special price is for what is in stock only and ends 8/30 10pm MST. We also have 3 new sequins                                                      Here's what I've created for you... I created for you this really cute scarecrow garden scene card.  I stamped the adorable girly scarecrow from the Autumn Wishes stamp set on to watercolor paper in Versafine ink and embossed it with clear embossing powder.  I colored her in with Tombow watercolor markers.  I then added some wink of Stella over the hat band and hair bands to make them pop.  I stamped several of the pumpkins, leaves, acorns and mushrooms coloring them all the same way. I then cut som